Are you ready to take your video production to the next level? Look no further than “Mastering Lighting Techniques for Video.” In this article, you will find a treasure trove of valuable lighting tips and techniques that will enhance the visual appeal and professionalism of your videos. Whether you are a beginner or an experienced videographer, these expert tips will surely help you create stunning visuals that captivate your audience. So grab your camera, let’s shed some light on how to master lighting techniques for video!

Understanding Lighting
Importance of Lighting in Video Production
Lighting plays a crucial role in video production, as it has the power to completely transform the look and feel of a scene. It not only ensures that the subject is properly illuminated, but also helps to create the desired mood and atmosphere. Whether you’re shooting a documentary, a music video, or a short film, understanding the importance of lighting is essential for creating visually stunning and impactful videos.
Types of Lighting
There are several types of lighting commonly used in video production, each serving a specific purpose. Key lighting is the primary light source that highlights the subject and provides the main illumination. Fill lighting is used to reduce shadows created by the key light, ensuring that the subject is evenly lit. Backlighting is placed behind the subject to separate them from the background, adding depth and dimension to the shot. Understanding these different types of lighting and how to use them effectively is key to achieving professional-looking videos.
Color Temperature and CRI
Color temperature refers to the color of light emitted by a light source, usually measured in Kelvin (K). It ranges from warm (yellow/red) to cool (blue). Understanding color temperature is important because it can drastically affect the mood and tone of a video. Additionally, the Color Rendering Index (CRI) measures how accurately a light source can reproduce the colors of objects in comparison to natural light. A high CRI is desirable for maintaining accurate and vibrant colors in video production.
Key, Fill, and Backlighting
Key, fill, and backlighting are essential lighting techniques used in video production. Key lighting is the main source of light that illuminates the subject and sets the overall tone of the scene. Fill lighting helps to balance the light by filling in shadows created by the key light, ensuring even illumination. Backlighting is positioned behind the subject, highlighting the edges and separating them from the background. This technique adds depth and three-dimensionality to the shot, creating a visually appealing and professional look.
Essential Lighting Equipment
Cameras and Lenses
When it comes to lighting for video production, it’s important to have the right cameras and lenses. High-quality cameras with good low-light performance are essential for capturing well-illuminated footage. Additionally, selecting the appropriate lenses, such as prime lenses or zoom lenses with wide apertures, can help achieve a shallow depth of field and enhance the overall visual aesthetics of the video.
Lighting Fixtures
Lighting fixtures are the tools used to illuminate the scene. There are various types of lighting fixtures available, including LED lights, tungsten lights, and fluorescent lights. LED lights have become increasingly popular due to their energy efficiency, versatility, and adjustable color temperature. Tungsten lights produce a warm, natural light but require more power. Fluorescent lights offer soft and even lighting but may require color correction.
Lighting Modifiers
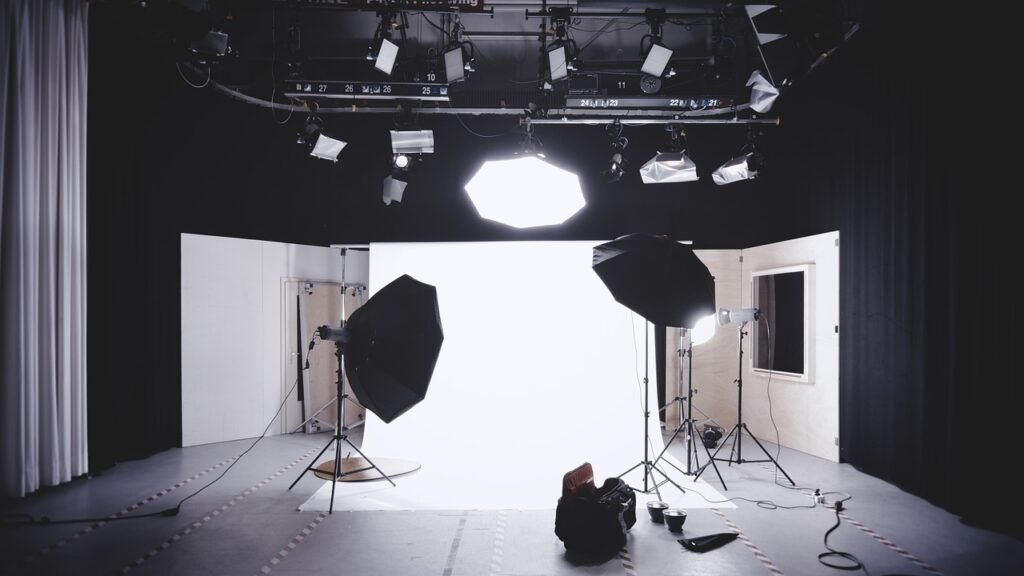
Lighting modifiers are accessories that alter the quality and direction of light. They can be used to diffuse, soften, or shape the light to achieve the desired effect. Some common lighting modifiers include softboxes, diffusers, umbrellas, reflectors, and grids. These tools are crucial for controlling and manipulating the light to create different moods, textures, and shadows in your video.
Grip Equipment
Grip equipment is used to support and position lighting fixtures and modifiers. Stands, booms, clamps, and other grip equipment are essential for ensuring that the lighting is properly placed and securely held in position. These tools allow for precise control over the lighting setup, helping to achieve the desired look and prevent any accidents or mishaps during filming.
Lighting Techniques
Three-Point Lighting
Three-point lighting is a classic lighting technique widely used in video production. It involves the use of three main lights: a key light, a fill light, and a backlight. The key light is positioned to one side of the subject and serves as the primary source of light. The fill light is placed on the opposite side of the key light and helps to fill in shadows. The backlight is positioned behind the subject to separate them from the background. This technique creates depth, dimension, and overall balance in the shot.
Rembrandt Lighting
Rembrandt lighting is a lighting technique that emulates the style of the famous Dutch painter Rembrandt. It involves positioning the key light at a 45-degree angle to the subject, creating a triangle-shaped highlight on the cheek opposite the light source. The fill light is used to soften the shadows created by the key light, but should not completely eliminate them. This technique adds a dramatic and moody effect to the video, often used in portraits and character-driven scenes.
Butterfly Lighting
Butterfly lighting, also known as “Paramount lighting” or “Glamour lighting,” is commonly used in beauty shots and interviews. It involves positioning the key light directly in front of the subject, slightly above eye level. This creates a small, butterfly-shaped shadow under the nose. The fill light is placed below the subject’s face to soften the shadows and provide even illumination. Butterfly lighting produces a flattering and glamorous effect, highlighting the subject’s features and minimizing imperfections.
High Key Lighting
High key lighting is a technique that involves evenly lighting the entire scene, minimizing shadows and achieving a bright and light-hearted look. It is commonly used in commercials, music videos, and upbeat scenes. To achieve high key lighting, a combination of key and fill lights is used to eliminate shadows. The lighting setup is generally bright, with a focus on whites and pastel colors. High key lighting creates a visually pleasing and cheerful atmosphere, perfect for capturing a positive and energetic mood.
Low Key Lighting
Low key lighting is the opposite of high key lighting, as it creates a darker and more dramatic atmosphere. It involves using minimal lighting to intentionally create deep shadows and high contrast. This technique is commonly used in horror films, film noir, and suspenseful scenes. By strategically using a single key light and allowing the majority of the scene to fall into darkness, low key lighting creates a mysterious and intense mood that adds depth and tension to the video.
Silhouette Lighting
Silhouette lighting is a technique where the subject is backlit, resulting in a darkened figure against a brighter background. This technique creates a striking and visually compelling effect. Silhouette lighting is often used to convey emotion, mystery, or anonymity. By positioning the subject in front of a light source, such as a sunset or a window, the viewers’ attention is drawn to the outline and shape of the subject, emphasizing their presence without revealing specific details.
Controlling Light
Using Diffusion and Diffusion Materials
Diffusion is the process of softening and spreading light to create a more flattering and even illumination. Diffusion materials, such as diffusion gels, silk, or nylon fabric, are often used to achieve this effect. By placing diffusion materials in front of the light source, the harshness of the light is reduced, resulting in a softer and more natural-looking illumination. Diffusion can be particularly useful when shooting close-ups or scenes that require a gentle and diffused light appearance.
Using Reflectors and Bounce Cards
Reflectors and bounce cards are essential tools for manipulating and redirecting light. Reflectors are usually large, reflective surfaces that bounce light back onto the subject, filling in shadows and providing additional illumination. Bounce cards, on the other hand, are smaller, opaque cards that are used to bounce light into specific areas, such as the eyes or a specific object. Reflectors and bounce cards are valuable assets in video production, as they allow for precise control over the lighting setup and help achieve the desired look.
Controlling Shadows with Flags and Cutters
Flags and cutters are used to control and manipulate the direction and intensity of light, primarily by excluding unwanted light sources and preventing unwanted shadows. Flags are opaque panels placed between the light source and the subject to block or shape the light. Cutters, also known as barn doors or gobos, are used to create precise and controlled shadows by shaping the light beam. By strategically positioning flags and cutters, you can enhance the overall lighting and ensure that the focus remains on the subject.
Controlling Light Intensity with Dimmers
Dimmers are devices used to adjust the intensity of the light. They allow for a smooth transition from bright to dim lighting, providing more control over the ambiance and mood of the scene. By using dimmers, you can easily create gradual lighting changes or emphasize specific elements within the frame. Dimmers are particularly useful when filming time-lapse sequences or scenes that require dynamic lighting adjustments.
Color Theory and Lighting
Understanding Color Temperatures
Color temperature refers to the perceived warmth or coolness of light. It is measured on the Kelvin (K) scale, with lower values indicating warmer (more yellow/red) light and higher values representing cooler (more blue) light. Understanding color temperature is crucial in video production, as it influences the overall mood, atmosphere, and emotional impact of the scene. By choosing the appropriate color temperature for your video, you can enhance the story and convey specific emotions to your audience.
Creating Mood with Color
Color has the power to evoke emotions and set the mood in a video. By carefully selecting and manipulating colors, you can create a specific atmosphere or reinforce the narrative. Warm colors, such as red and orange, often evoke passion, energy, and warmth. Cool colors, like blue and green, are associated with calmness, tranquility, and sadness. Additionally, complementary colors (colors opposite each other on the color wheel) can create visual harmony and add depth to your shots.
Color Harmonies for Lighting
Color harmonies refer to the combination of colors that are pleasing to the eye and create balance in a scene. The most commonly used color harmonies are complementary, analogous, and triadic. Complementary colors are opposite each other on the color wheel and create a strong contrast. Analogous colors are adjacent to each other and create a harmonious and unified look. Triadic colors are evenly spaced on the color wheel and provide a vibrant and balanced color scheme.
Color Gels and Filters
Color gels and filters are used to alter the color temperature and create specific lighting effects. Gels are translucent sheets that are placed in front of the light source to add color. They come in a variety of colors, allowing you to create specific moods and atmospheres. Color filters, on the other hand, are added in post-production to enhance or change the colors in the video. Both color gels and filters are valuable tools for adding creative touches and enhancing the visual aesthetics of your videos.
Setting Up a Lighting Kit
Determining Lighting Needs
Before setting up a lighting kit, it’s essential to determine the specific lighting needs of your video project. Consider the location, the desired mood, and the technical requirements. Ask yourself questions like: How many lights will you need? What types of lighting techniques will you be using? Do you need to accommodate different color temperatures? By understanding your lighting needs, you can ensure that you have the necessary equipment and accessories to achieve the desired look.
Choosing the Right Lighting Kit
Choosing the right lighting kit is crucial for achieving professional-looking results. Consider factors such as budget, portability, power source, and the quality of the equipment. LED lighting kits are popular due to their energy efficiency and versatility. They are lightweight, adjustable, and can be powered by batteries, making them ideal for both indoor and outdoor shooting. Additionally, consider investing in a kit that includes various lighting modifiers and grip equipment to enhance your lighting setup.
Organizing and Packing the Kit
Proper organization and packing of your lighting kit are essential for quick and efficient setups and teardowns. Keep your equipment organized in a way that makes it easy to locate and access each item. Consider using dividers, compartments, or bags to keep everything in its place. Labeling cables and accessories can also help save time. When packing, make sure all equipment is securely stored, protecting delicate items from potential damage during transportation.
Safety Measures
Safety should always be a top priority when working with lighting equipment. Ensure that all lights and electrical connections are in good condition and properly grounded. Avoid overloading circuits or using faulty equipment. Use caution when working with high-temperature lights to prevent burns or fire hazards. Additionally, be mindful of the placement of cables and ensure they are secured to avoid trip hazards. By following safety protocols and using common sense, you can protect yourself, your team, and your equipment during production.
Lighting for Different Settings
Indoor Lighting Techniques
Indoor lighting requires careful consideration of the available light sources and the desired look of the scene. If working with natural light indoors, position your subject near windows or use reflectors to bounce light onto the subject. Alternatively, artificial lighting techniques such as three-point lighting or Rembrandt lighting can be employed to achieve specific effects. Diffusion materials can be used to soften harsh indoor lighting, resulting in a more flattering and natural appearance.
Outdoor Lighting Techniques
Outdoor lighting presents various challenges but also offers unique opportunities. When shooting outdoors, timing is crucial, as the quality of light changes throughout the day. Filming during the golden hours (early morning or late afternoon) can provide warm and soft lighting for a more cinematic look. In harsh midday sunlight, diffusion materials and reflectors can be used to control the light and minimize shadows. Alternatively, artificial lighting can be used to supplement or create specific effects in outdoor settings.
Studio Lighting Techniques
Working in a studio environment provides control over the lighting setup, making it ideal for achieving consistent and precise lighting. Studio lighting typically involves a combination of key, fill, and backlighting. Softboxes or diffusers are commonly used to create even and diffused lighting, while flags and cutters help shape the light. The advantage of a studio setting is the ability to manipulate the lighting to achieve a specific look or replicate natural lighting conditions.
Location Lighting Techniques
Shooting on location often requires adapting to the available lighting conditions. It’s important to scout the location beforehand and understand the natural light sources and potential challenges. Environmental lighting can be utilized creatively to enhance the atmosphere and mood of the scene. Additional lighting techniques may be required to supplement or modify the natural light, such as using reflectors, gels, or artificial lighting sources. The ability to adapt and creatively problem-solve is key when working with location lighting.
Natural Lighting and Artificial Lighting
Working with Natural Light
Natural light can be a beautiful and versatile lighting source. It provides a realistic and authentic look to videos. When working with natural light, it’s important to observe and understand the quality, direction, and intensity of the light throughout the day. Positioning your subject appropriately in relation to the light source can create different effects and moods. Additionally, using reflectors or diffusers can help control and manipulate the natural light to achieve the desired look.
Enhancing Natural Light with Reflectors
Reflectors are valuable tools for enhancing the natural light in your video. Reflectors bounce light back onto the subject, filling in shadows and providing additional illumination. When working with natural light, reflectors can be used to redirect and shape the light, creating more flattering and even lighting conditions. Silver or white reflectors are commonly used to provide neutral fill light, while gold reflectors can add warmth and a natural sunlight effect.
Balancing Natural and Artificial Light
Balancing natural and artificial light can be challenging but can also create visually interesting and dynamic shots. When combining natural and artificial light, it’s important to pay attention to the color temperature and intensity of each light source. Gels or color filters may be needed to match the color temperature of the lights. Careful placement and manipulation of each light source can help create a seamless blend and ensure that the subject is properly illuminated while maintaining the desired mood and atmosphere.
Creating Artificial Lighting Setups
Artificial lighting setups are often necessary when shooting in locations with insufficient natural light or when a specific look or effect is desired. When creating artificial lighting setups, it’s important to consider the desired mood, the location, and the available equipment. By utilizing various lighting techniques mentioned earlier, such as three-point lighting or silhouetting, you can create visually compelling scenes that effectively convey your intended message.
Special Lighting Techniques
Lighting for Green Screen / Chroma Key
Lighting for green screen or chroma key requires attention to detail to achieve a clean and seamless composite. The key is to light the subject and the green screen separately, ensuring minimal shadows and even illumination. Properly lighting the green screen without any shadows or hotspots prevents issues during the post-production keying process. Matching the lighting on the subject to the background in terms of color temperature and intensity is also important for a convincing and realistic final result.
Lighting for Slow Motion
When shooting in slow motion, it is crucial to have adequate lighting to capture enough frames per second. Slow-motion footage requires significantly more light compared to regular speed filming. Since slower frame rates decrease the amount of light each frame receives, proper illumination is essential to maintain a well-exposed image. Additional lighting fixtures or more powerful lights may be needed to compensate for the reduced exposure time.
Lighting for Interviews
Lighting interviews involves creating a well-lit and visually appealing setup that compliments the subject and the content. Typically, a soft and flattering lighting approach is employed, prioritizing even illumination and minimizing shadows. The three-point lighting technique is commonly used, with the key light positioned at a 45-degree angle to the subject. Fill lighting helps reduce shadows, and backlighting separates the subject from the background. It’s important to create a comfortable atmosphere for the interviewee while ensuring the lighting effectively captures their expressions and emotions.
Lighting for Product Shots
Product shots require careful consideration of lighting to showcase the product’s features and details. A combination of key, fill, and accent lighting is often used to enhance the product’s shape, texture, and color. Diffusion materials can be used to soften the lighting and minimize reflections, while reflectors and bounce cards can be used to add fill light and highlight specific areas of the product. It’s important to find the right balance between lighting the product and controlling any unwanted reflections or glare.
Lighting for Action Shots
Action shots require a dynamic and flexible lighting setup to capture movement and energy. Continuous lighting fixtures with a high output are often used to provide consistent illumination throughout the action sequence. To freeze fast-moving subjects, high shutter speeds and reduced exposure times may be necessary, requiring more powerful lighting sources. Additionally, the positioning of the lights should consider the direction of the action and the desired visual impact. By carefully coordinating the lighting with the action, you can create visually striking and engaging action shots.
Troubleshooting Lighting Challenges
Dealing with Shadows and Glare
Shadows and glare can be challenging to manage in video production. To minimize shadows, adjust the position and angle of the lighting fixtures, or use reflectors to fill in the shadows. If glare is a problem, consider using flags or cutters to control the light and prevent it from bouncing off reflective surfaces. Diffusion materials can also help by softening and spreading the light, reducing harsh reflections and glare.
Addressing Exposure and Contrast Issues
Exposure and contrast issues can arise when lighting a scene with extreme light and dark areas. To address exposure issues, adjust the intensity of the lights or use dimmers to control the overall lighting levels. Contrast issues can be mitigated by adding fill light to balance the bright and dark areas. Balancing exposure and contrast requires careful observation and adjustments to ensure a well-exposed and visually appealing video.
Avoiding Flickering and Color Banding
Flickering and color banding can occur due to a variety of factors, such as improper frame rates, incompatible lighting with the camera’s shutter speed, or low-quality lighting fixtures. To prevent flickering, ensure that your lighting fixtures are compatible with the camera’s settings and choose a frame rate that aligns with the lighting frequency. If color banding is an issue, adjust the lighting or camera settings to reduce the possibility of interference. Using high-quality lighting fixtures and equipment can also minimize these issues.
Mitigating Light Spill
Light spill occurs when the light spills outside the intended area, creating unwanted reflections or overly illuminated backgrounds. To mitigate light spill, use flags or cutters to block or shape the light. Positioning the lights further from the subject or using honeycomb grids or snoots can help control the light’s direction and minimize spill. Additionally, adjusting the intensity of the light or adding diffusion materials can further help control and reduce spill during filming.
Solving Power and Electrical Issues
Power and electrical issues can disrupt a smooth filming process. To avoid power issues, ensure that the electrical supply can handle the demands of your lighting equipment. Use surge protectors or uninterruptible power supplies (UPS) to safeguard against power fluctuations or outages. Properly ground all electrical equipment and use cables and connectors that are in good condition. Regularly check your equipment for any signs of wear or damage and seek professional assistance if needed. By prioritizing electrical safety measures, you can prevent accidents and ensure a reliable power supply during video production.
As you can see, understanding lighting is truly essential for successful video production. From the importance of lighting to the different lighting techniques and equipment, each aspect plays a crucial role in creating visually stunning videos that captivate and engage audiences. By mastering the art of lighting, you have the power to transform ordinary scenes into extraordinary visual experiences. So, go ahead and experiment with different lighting setups, techniques, and colors to unleash your creativity and elevate your videos to the next level.


